Blender 3.4 Voxel Heat Diffuse Skinning v3.4.3 Crack Download
New Features
The latest version is 3.4.3, updated on February 14, 2023.
Physically based energy attenuation algorithm.
Built-in ‘Surface Heat Diffuse Skinning’ add-on.
Built-in ‘Corrective Smooth Baker’ add-on.
Complete skinning solution.
Supports Blender v2.8 – v3.4.
How Can It Help Me?
The add-on can help you to resolve three skinning problems:
Blender throws a message: ‘bone heat weighting: failed to find solution for one or more bones’.
Some body parts or accessories are ignored, you have to fix vertex weights by hand.
You have spent a long time to fix vertex weights, but you are still not satisfied with the result.
Quick Start
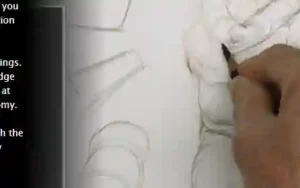
The soldier has a lot of equipments, even if you are a skilled artist, it will take a long time to skin the character.
You can use this add-on to generate perfect vertex weights for the soldier in less than five minutes.
What the artists say:
“Outstanding! You saved me a ton of work!”
“I think you may have saved my life with this add on. Of all the add ons I’ve bought, for what I’m doing and how it’s helping me, this is NUMBER ONE! thanks!”
You may find more comments in the ‘Ratings’ page.
Full Tutorial:
Video Package: Download the HD version of the video(Format:zip,Size:15MB,Date:Jun 17,2021).
Watch Online:
The Story
Two months ago(2017), I needed another 3d character for our educational product, so I quickly generated a character within ‘MakeHuman’, when I tried to bind the character to the armature in Blender, the result frustrated me – The hair broke into pieces, the eyes were drifting in the sky, and there were holes in the body.
If the character is watertight, Blender’s built-in automatic armature deform will work very well, but artists work in their own way, they create various character components, then group them together, this is artists’ most natural workflow.
I used to subscribe Maya LT from Stream platform several years ago, Maya LT has an amazing feature – ‘Geodesic Voxel Binding’, it can deal with non-watertight character, why not add the feature to Blender?
My goal is to achieve better result and better skinning solution, not a simple copy from May LT.
When the product was born, I was so proud of the add-on, it uses unique ray tracing technology to build voxel grid, which is super robust and accurate, and the add-on combines Blender’s built-in heat map diffuse skinning tool and the voxel heat diffuse skinning tool to deal with all skinning issues, I can always get perfect results.
It’s a milestone, Blender has the world’s best armature deform portfolio today.
That’s the story of this add-on.
Introduction
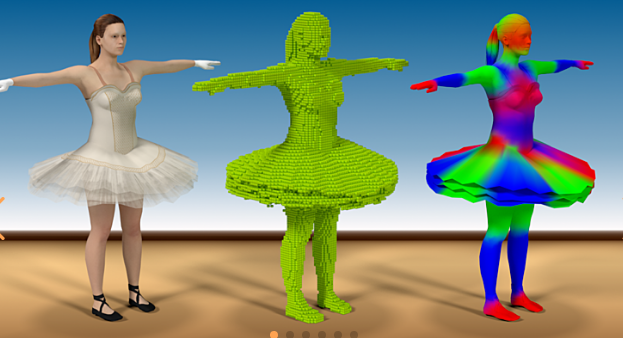
Traditional heat map diffuse skinning algorithm can only deal with watertight meshes, but artists create character components in their own way, then group them together to a character, usually the character is not seamless, this often cause traditional heat map diffuse skinning algorithm to fail.
Voxel heat diffuse skinning algorithm can overcome the shortcoming, it converts the non-seamless character into a solid statue, heat diffuses in the solid statue, so we can get the most natural vertex weights.
The voxel heat diffuse skinning had already been equipped in Autodesk’s Maya and 3ds Max for years, but Blender users don’t have an opportunity to benefit from the feature.
Traditional heat map diffuse skinning algorithm can get much better result in detailed areas such as fingers and toes than voxel heat diffuse skinning algorithm, we can combine them to get perfect result with this Blender add-on.
We believe that all digital artists and game teams want this feature, fortunately, you can do perfect automatic vertex weight skinning within Blender today.
Interface
When selecting all the sub-meshes and the armature, the interface will appear in the animation tab of the tools shelf, one mouse click to finish voxel heat diffuse skinning.
Proved Blender version: v2.8 – v3.3.
Platform
Linux(x86_64)
Windows 7-11(x86_64/x86)
macOS 10.9-12.4(x86_64)
Note: The add-on supports both 64 bit and 32 bit of Windows.
CPU
The algorithm uses multiply CPU cores to boost the running speed, more CPU cores, more faster it runs.
Memory
The algorithm needs large memory to run high voxel resolution, the computer’s memory is at least 8GB
How To Install
Launch Blender, navigate to ‘Edit->User Preference…->Add-ons’, click the ‘Install Add-on from file…’ button, a pop up dialog will appear, select ‘voxel_skinning-3.4.2.zip’, click the ‘Install Add-on from file…’ button on the pop up dialog, the add-on will be installed to Blender’s addons directory.
When the pop up dialog closed, we are still on Addons page, a few seconds later, the add-on will appear, activate the add-on, then click the ‘Save User Settings’ button and close the ‘Blender User Preference’ window.
Note: Please don’t simply copy and paste the unzipped add-on directory to Blender’s own working add-on directory, because the operating system may prevent the add-on from writing temporary data to the directory, which will cause the add-on don’t work at all.
How To Upgrade
Download the new version of the product.
Launch Blender, navigate to ‘Edit->User Preference…->Add-ons’, type ‘voxel’ in the search box, the add-on will appear, click the small triangle beside the add-on to expand the contents, click the ‘Remove’ button to remove the add-on.
Install the new version of the product.
Blender 2.8+ Support
The latest version supports Blender 2.8+.
Please re-download your product and extract the package, there are two sub-directories named by Blender version, you may choose the corresponding version to install.
Type ‘n’ key in the 3d view if the sidebar is hidden. If you select both the meshes and the armature, the user interface will appear in ‘View3D->UI->Mesh Online’ tab of the sidebar.
Personal Workflow
Select all the sub-meshes and one armature, the interface will appear on the tool shelf section of ‘View3D->Tools->Animation’.
Because the alogrithm will convert all the sub-meshes to one solid statue to obtain best result, you’d better select all the sub-meshes and one armature before you run voxel heat diffuse skinning.
If you are rigging for RPG games, the armature is usually not complicated, you can use the default parameters, select all the sub-meshes and the armature, click the ‘Voxel Heat Diffuse Skinning’ button, the result will be fairly good.
Here are the steps:
1. Select all the sub-meshes and the armature, click the ‘Voxel Heat Diffuse Skinning’ button.
If you are rigging for a movie, the armature is usually rather complicated, in this case, we combine traditional heat map diffuse skinning and voxel heat diffuse skinning to get perfect result:
Here are the steps:
1. Select all the sub-meshes and the armature, type ‘Control’ key + ‘P’ key, from the pop up menu, click Armature Deform->With Automatic Weight.
2. Select the sub-mesh which vertices need to be protected, type ‘Tab’ key to enter ‘Edit’ mode, type ‘Z’ key to enter wireframe display mode, type ‘A’ key twice to select nothing, use either box select tool or circle select tool to select character’s hands parts and feet parts(if the character does not wear shoes), or other very detailed areas, type ‘Z’ key to back to solid mode, type ‘Tab’ key to back to object mode.
3. In the addon’s interface, check the ‘Protect Selected Vertex Weight’ button, all the selected vertices’ weights will be merged to new weights which generated by voxel heat diffuse skinning.
4. Select all the sub-meshes and the armature, click the ‘Voxel Heat Diffuse Skinning’ button.
Team Workflow
If you have a powerful server, for example, the CPU has 32 cores or more, you can greatly boost the speed by distribute the voxel heat diffuse task to the server.
From the ‘Blender User Preference’ window, activate the other three addons, click the ‘Save User Settings’ button and close the ‘Blender User Preference’ window.
Here are the steps:
1. Select all the sub-meshes, click File->Export->Voxel Mesh (.txt), type a filename, click ‘Export Voxel Mesh’ button to export a voxel mesh file.
2. Select the armature, click File->Export->Voxel Bone (.txt), type a filename, click ‘Export Voxel Bone’ button to export a voxel bone file.
3. Copy the two files to the server, and copy the addon’s zip file to the server, unzip the addon file, there is a command line tool for each platform: Linux, Windows and Mac, you can find them in the sub-directory of ‘voxel_heat_diffuse_skinning’->’bin’, in fact, the actual task is done by the command line tool.
4. Open a terminal window, run the command line tool for your platform without parameters, it will report the usage.
5. Run the command line tool for your platform with parameters, the parameters are the same as in the add-on’s interface except that you need to tell it where the voxel mesh file is, where the voxel bone file is, and where the voxel weight file is.
6. After the command line tool finished runing, copy the generated voxel weight file to the desktop computer. From Blender’s 3D View, select all the sub-meshes and the armature, click File->Import->Voxel Weight (.txt), select the voxel weight file, there is a ‘Protect Selected Vertex Weight’ button in the left panel, check the button if you want to protect some vertices’ weights, click ‘Import Voxel Weight’ button to import the voxel weight file.
Auto-Rig Pro Workflow
This add-on is compatible with Auto-Rig Pro, if you own Auto-Rig Pro, you can first bind all the sub-meshes to the armature with the “Bind” button of Auto-Rig Pro, then use this addon on top.
Here is the document: http://lucky3d.fr/auto-rig-pro/doc/auto_rig.html#skinning-binding.
I have recorded a short video to show how simple the workfow is, but it is just a basic binding, for more advanced binding, please refer to the above document.


Post Comment